Tampilkan postingan dengan label tip. Tampilkan semua postingan

Rabu, 23 Maret 2016

How To Stop iOS OTA Update Once Started on iPhone or iPad

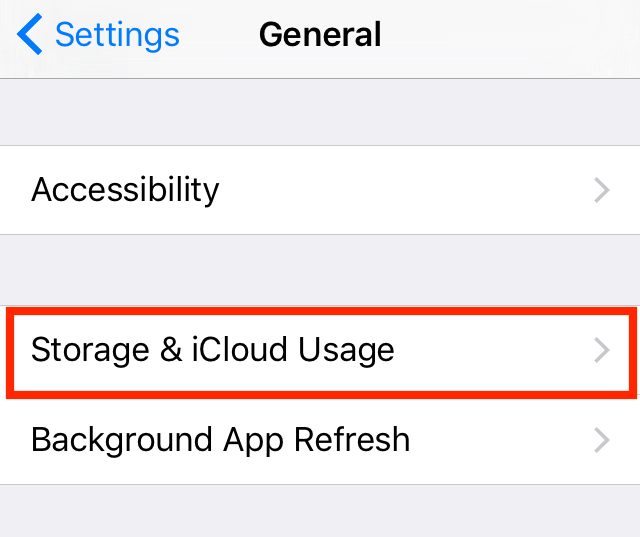
If you start an iOS over-the-air update, that is, a update straight from your iPhone or iPad, from Settings > Software Update, and then need to stop the update before it's done downloading - follow these steps: 

1. Open "Settings" app.  

2. Tap "General." 


3. Tap "Storage & iCloud Usage." 


4. Under Storage heading, tap "Manage Storage."  


5. A list will populate. Find "iOS X.X" on the list, and tap on it. 


6. Now, tap "Delete Update", then again on the pop-up menu to confirm. 

7. To re-download the update, go back to Settings > General > Software Update.    


Kamis, 09 Juli 2015

How To Disable Adobe Flash Player In Apple's Safari & Google Chrome Web Browsers

Are you tired about hearing about all of these Adobe Flash exploits? Do we really even need Flash Player in our web browsers these days? Flash used to be used in a lot of websites, but these days Flash has been used a lot less, thanks to the iPhone and iPad not supporting Flash, and because of other tools becoming popular, like HTML5. Not even YouTube needs Flash player anymore.

If you think you don't need Flash on your web browser anymore, maybe it's time to remove or disable Flash altogether.

To make this transition, lets start with just disabling Adobe Flash from your web browser(s). As this is mainly a Mac / iOS website, I'll mention how to, for the two most popular browsers; Google Chrome and Apple's Safari.

To disable Adobe Flash Player in Google Chrome: 

1. Type into the address bar: chrome://plugins 

2. Find on the list "Adobe Flash Player".

3. Click "Disable".

Or the other option is to set all plugins to disabled by default and to ask you to enable them when detected. To access this setting;

1. Type into the address bar: chrome://settings/content

2. Scroll down to, "Plugins".

3. Select option, "Let me choose when to run plugin content".


To Disable Adobe Flash in Apple's Safari:

1. Launch Safari, then click "Safari" in the in the Apple Menu Bar.

2. Click "Preferences".

3. Click on the "Security" tab.

4. Under heading "Internet plug-ins", click "Website Settings".

5. Click "Adobe Flash Player" on the sidebar.

6. Configure sites (if any) listed in the box, then below on title "When visiting other websites", change option to, "Block", or "Ask", if you still want the option to enable Flash on some websites.

Senin, 12 Mei 2014

How To Print (Save) To A PDF File In Chrome & Safari - Mac/Windows Tutorial

You may get into a situation where you need to print a file, webpage, document, ect... but maybe you don't have a printer around, or just don't want to waste paper and ink. That's where Printing To PDF comes in handy.


How To Print (Save) To A PDF File In Google's Chrome Browser:

1. Firstly you'll need the Print dialog box open, if you don't have it open, one way it can be accessed by is 'right-clicking' ('control+click' on a mac) on the page and then selecting "Print".

2. Next, in the Destination section, click "Change..."

3. Now under Local Destinations, click "Save as PDF". 

4. Then click, "Save".


How To Save As A PDF File In Apple's Safari Browser:

1. In Safari, click (from the menubar) File > Print.

2. Then from the drop-down menu, at the bottom next to the question mark, it will write "PDF". Click this button.

3. Then click "Save as PDF..."


Kamis, 24 April 2014

How To Disable Facebook Auto-Play Videos on iPhone/iPad & Web

We all now that videos can use a lot of data, and if you're not connected to Wi-Fi, you could use up a lot of data just by browsing Facebook on your mobile device. If you're like the many people who hate that Facebook now auto-plays videos, here's how to switch the feature off on mobile (iPhone/ iPad) and on your desktop/laptop computers.


How To Disable Facebook Auto-Play Videos on iPhone/iPad

On iOS you can disable auto-playing videos if you are not connected to Wi-Fi internet. Great way to save mobile data. If you are on Wi-Fi, the videos will still play. There is no way to disable them. 

1. If you're on a iPhone or iPad, head over to the iDevices Settings app. 
2. In Settings, find and open the Facebook app. 
3. Then tap Settings
4. Under "Video", switch on the option, Auto-play on Wi-Fi only.


How To Disable Facebook Auto-Play Videos on the Web

On the web version on Facebook, can can disable auto-playing videos. 

1. On the Facebook navigation bar, click the drop down arrow on the top right corner. 
2. Now from the drop-down menu, click Settings
3. On the left side of the page, click Videos
4. Now switch the "Auto-Play Videos" option to Off

Rabu, 23 April 2014

iOS 7 How To Not Zoom In Wallpaper - Tutorial - iPhone/iPad

A big problem in iOS 7 with the new parallax / perspective zoom feature was it would mess up your wallpapers. It would also require you to have an extra boundary on photos to allow the 'movement'.

Apple has 'fixed' this problem in iOS 7.1 by allowing users to disable the perspective zoom feature on the wallpapers, while not disabling all other motion on your iPhone/iPad.

For the following to work, you must have iOS 7.1 installed. If you haven't updated already, go to: Settings > General > Software Update.

iOS 7 - How To Not Zoom In On Wallpapers

Disabling Perspective Zoom on wallpapers is really quite simple. Whether you choose your wallpaper through; Settings > Wallpaper & Brightness, or from the Photos app.

On the Wallpaper Preview page, you'll see a new button in iOS version 7.1 which says: Perspective Zoom. All you need to do is switch this option to "Off".  You'll also notice that by just pinch and zooming and moving the image around yourself, the option will turn itself off or on - depending if the current zoom would support the parallax effect.

See more iOS Tips and Tutorials by clicking here

Kamis, 17 April 2014

Blue Dot Next To App Name - What Does It Mean - iPhone/iPad Tip


Every seen a blue dot next to an app's name and wondered why? What that blue dot signifies is - that application has been updated since the last time you have used it.

If you didn't update the app - you may have automatic updates switched on. If you don't want apps updating in the background, you can disable automatic updates by navigating to:

Settings -> iTunes & App Store -> Switch 'Updates' to 'Off'. 

---

See more iOS Tips and Tutorials by clicking here


Jumat, 28 Maret 2014

Mac Tip: How To Lock Your Mac Screen Without Putting It Into Sleep Mode


In many situations, you might want to lock your Mac Computer because you'll be monetarily away, but you don't want to put the Mac into sleep mode because you may have background application running. Here's how to lock only the screen.


To lock your Mac's screen, without putting it into sleep mode:


On new Mac's (ones without an optical disc drive):

At the same time press the keys: 
Control + Shift + Power.


On older Mac's (the ones with optical disc drives):

At the same time press the keys: 
Control + Shift + Eject.


*Note that if you're Mac is not plugged into a power source, it will eventually go into sleep mode. Also due to your set power settings, your Mac may also eventually go into sleep mode. 

Minggu, 23 Maret 2014

iOS Tip: How To Attach Picture To Email On iPhone & iPad

Another reason why the Apple Mail app on iOS is not as great, or at least intuitive, as it should be: Attaching a picture or video in email... Have you tried it on your iPhone or iPad? You may of one day been typing out an email, then wanted to send a picture (or media file) and thought, "Where is the attach button?" You didn't find it, because there isn't one.

So how do you send pictures in Apple Mail on iOS? Well there is two ways. One way is for when you are starting out a new message, or aren't already typing a message. And the other for when you want to add media into an existing draft or reply.

The first way to Attach Photos or Videos in Email on Apple iOS Mail:


Using the Share Button To Attach A Photo In Mail:

The more obvious way to send a photo by email is to locate the file in the Photo's App, tap the Share button (the square with arrow pointing up), then tap "Mail". This will attach the photo to a new email, where you can fill in the blanks, and send.

But what if you wanted to send more than one photo? For that, all you need to do is, locate the pictures you want to email in the gallery view in Photos. Tap the "Select" button, select the multiple photos, then tap the Share button, and then "Mail".

But what if you had already started typing the email? That's where technique two, is useful.


Copying & Pasting Photos into Mail: 

The second way to attach a photo to an email is to simply copy and paste. Just locate the photo, and open it. Then press and hold on the photo, until "Copy" appears. Tap "Copy". Now go to your email that you are writing, and in the message, tap. Controls should show. Tap "Paste", and your photo will be added into the message. You can do this multiple times, however, remember that only 10MB of data can be sent in a single email, so that'd be only about two to three (8 megapixel) photos, per message.


Kamis, 20 Maret 2014

How To Block Facebook Apps, Games / Stop App Notifications


One of the most annoying Facebook Notifications are those Game / App requests and invitations that come from your friends. There are some ways to stop these notifications, that do not include removing that friend. Although, that could be a good solution too.


How To Stop Mobile (iPhone, iPad) Facebook App Push Notifications / Requests / Invites:

Notifications on your iPhone or even iPad should be of some importance, not someone has invited you to play some game.

1. Launch the Facebook app for iOS.
2. Tap the 'More' tab.
3. Scroll down to, and tap 'Settings'.
4. Now tap 'Notifications'.
5. Then tap 'Mobile Push'.
6. Find, and then uncheck: 'Application Requests' & 'Application Invites'.


How To Block Facebook Apps / Games: 

If you get a lot of requests from a certain app that you don't want /or use, a good option is to block that application. By blocking the app, you'll become invisible to it. Your friends will no longer be able to send you requests or invitations, and you'll no longer see the app. This is the perfect way to not have to deal with the certain app ever again.

You'll need to login to Facebook's desktop version for this method.

1. Login to Facebook. (Obviously).
2. Click the Settings Gear.
3. Then 'Settings'.
4. From the left hand-side menu, click 'Blocking'.
5. Scroll down to 'Block Apps'.
6. Type the name of the App you wish to block, and select it from the popup list.


How To Switch Off All Facebook Apps:

I would NOT recommend this, because it'll disable all Facebook apps, even the ones you may use or want to use. But, if you never want to use a Facebook application, follow these steps to switch off the Facebook App platform.

1. Login to Facebook. (Obviously).
2. Click the Settings Gear.
3. Then 'Settings'.
4. From the left hand-side menu, click 'Apps'.
5. Under 'Apps you use', where it says "Use apps, plugins, games and websites...", click 'Edit'.
6. Now click 'Turn Off Platform'. Remember to read all the warnings, and make sure you understand what doing this, will do, before you click the button.


Selasa, 11 Maret 2014

iOS 7.1 is Here! What They Changed: Removed Full Screen Caller ID Photo, Calendar List View, UI Tweaks, Faster Animations, & More...

Apple released software update iOS 7.1 today for iPhone, iPad and iPod Touch devices. Here is some new information about the new features and changes in the update. For how to update your device to the new version, see the previous post.

This post will not include all changes in iOS 7.1, but more of the noticeable changes.


Changes In iOS 7.1:

Caller ID Photos:
- In iOS for awhile now we've had full screen caller ID photos. You recieve a phone call, and if you had a photo associated with the contact, there image would show. In iOS 7.1, this is no-longer the case. Now the persons image is only shown in a tiny circle on the right of the screen, next to there name, with a empty blurry background. There seems to be no option to change this behavior. Really Apple? Have you been receiving calls from people who you don't want full screen images of, showing on your screen?

Phone App Buttons:
- Also in the Phone app, some small U.I. button changes, like the Answer/End call buttons are now round.

Calendar:
- Calendar now features a new option to show your day events listed in the month view, similar to how it was in iOS 6.
- Also you may see that Apple has chosen to automatically subscribe you to a U.S. Holiday's calendar. This can be unchecked in the 'Calendars' section.

Wallpapers:
- When setting a wallpaper, you now have the option to turn off the parallax (Perspective Zoom) effect.

U.I. Tweaks:
- Among the user interface tweaks are: Greens are now slightly darker. For example, the Messages icon.
- There is a new 'Turn Off' device screen.
- Control Center appears lighter and now has a little bounce added to the slide-in animation.
- The Keyboard has also received tweaks. The writing is now more bolder and the gray background has also slightly changed. Also the Shift key button has gotten a color change. Now when on, the key's background will be white with a black arrow. When Caps-lock is on, arrow will have a underline.

Animation:
- All the animation in iOS 7.1 are a lot more faster then in the previous version. It really makes the device seem faster.

Accessibility:
- Added to accessibility is new visual options. Button shapes, can make a background to show that text is a button.
- Increase Contrast has got a few new features including; 'Darken Colors', which make certain colors like the Blue Button text darker. And there's 'Reduce White Point', which makes all the 'white' a bit darker.


What do you think of iOS 7.1? Great improvements? Or epic fail? Let us know in the comments.

iOS 7.1 Is Here! - How To Update Your iPhone & iPad Devices!

Apple today has released a new software update (version: iOS 7.1) for iOS (iPhone, iPad, iPod Touch) devices. The new update has a bunch of new changes, but first - if you haven't updated yet, here's a small guide on how to do so.

Updating to iOS 7.1:

The first thing you'll want to do is BACKUP! Yes, it's very important, unless you want to lose your data. Now, chances are the update will run smoothly and you'll have no issue, but with all computers, sometimes things go bad. If your using iCloud, that's great - if you know how to backup to iTunes as well, even better!

The update is only around 220MB, but will need about 2GB of free space, so you may need to make some room on your device. You can check your storage from: SETTINGS > GENERAL > USAGE.

Next! Once your ready to update, if you're connected to a Wi-Fi network, you can update your device by heading to: SETTINGS > GENERAL > SOFTWARE UPDATE, and following the instructions.

To update through iTunes: Connect your device, and on the Info tab, click 'Check For Updates'...

However, if you don't know anything about the update, you may want wait and read part two of this post:  iOS 7.1 is Here! This is What They Changed!


Minggu, 02 Maret 2014

How To Fix: "Google Safe Browsing Service is Unavailable" Error in Safari - Mac Tip

If you look in your Security settings in Safari on your Mac computer, and see a warning that says, "The Google Safe Browsing Service is unavailable."  You'd probably feel a little concerned. This feature is apart of the Fraudulent sites protection in Safari. The list is provided by Google. 

I'm not sure why Safari gets this error, but it seems to be a problem with the database file, and there's a fix you can do, to get the Google Safe Browsing Service updated and working again. 

The culprit is the SafeBrowsing.db file. If you delete the database, Safari will reset the file. 


How To Fix: "Google Safe Browsing Service is Unavailable" Error in Safari 

1. On the Finder Menubar, click "Go".
2. Then click, "Go to Folder..."
3. Type in: /private/var/folders 
4. There will be a few folders, open them up and look for a folder with com.apple files.
5. Find, and open the folder named, com.apple.Safari. 
6. In this folder, there should be a file named, SafeBrowsing.db.
7. Send the SafeBrowsing.db file to the Trash. This will force Safari to rebuild the file. 
8. This should fix the problem. But check back again, a few days later, and see if there are no more errors. *Note, the file doesn't seem to be updated every day. 


Jumat, 28 Februari 2014

How To Show The Date On Mac Status Bar - Mac Tip

Did you know that you can show the time and date in the Mac Menubar? It's really handy to have, and it's easy to set up. There are also a bunch of other options you can modify...


How To Show The Date On Mac Status Bar

1. Open System Preferences.
2. In the fourth row, click Date & Time.
3. Click on the Clock tab.
4. Under date options, check on Show date.

There are also other great useful options in this menu tab. You can switch from a digital clock to a analog clock. Display the time with seconds. Flash the time separators. Switch to 24 hour time / or 12 hour time. Show AM / PM next to the time. You can also show the day of the week, as well.

And the last option in the Clock tab is Announce the time. You can customize how often, and get a system voice to speak the time, on the desired interval.

Click here for More Tips and Tricks about Mac's and iOS devices.


Rabu, 26 Februari 2014

Twitter Web Tip: How To Quickly Scroll To Top Of Page

Here is a quick little Twitter web tip:


After scrolling down a page, to quickly return to the top of the page, click the Twitter logo. 


Jumat, 21 Februari 2014

How To Mute People's Posts From Instagram, Facebook and Twitter On App Flipboard

Sometimes's you have to follow people on social networks by obligation. Maybe they're family, work/school friends, ect... But they are annoying and you don't want to see their posts in your feeds.

If you use the app, Flipboard, which is like your very own personal digital magazine, you can mute people! If you don't use the app, i recommend you check it out. It really is awesome. It's like a digital newspaper, but with content that actually matters to you.  

Muting someone will hide all their posts (when viewing in Flipboard) without having to un-follow/friend them. They'll never know that you are no longer seeing their annoying pictures or posts - that is, at least until the next time you see them and they ask why you never comment or like there stuff. 

Mute works for all types of social media accounts within Flipboard, like; Facebook, Twitter, Instagram... 
To hide someone's posts on Flipboard, follow these steps: 

1. Find a post from the person you want to mute. 
2. Next tap on their profile image.
3. Press the silhouette icon. 
4. Then press 'Mute'.
5. Then confirm. And now they posts will disappear! 


To un-mute someone on Flipboard: 

1. Press the Red Ribbon button.
2. Then tap 'My Flipboard'.
3. Press the Settings gear button.
4. Then 'Settings'.
5. Scroll down to 'Muted Authors'.
6. There you can remove the 'mute'.


How To Find A Certain iOS App In Google Search - iOS Tip

Have you ever searched Google for a App, only to find so many other websites with the same name instead? Well, here is a great little tip that I use all the time when searching for iOS Apps...


To find a certain app easily in Google Search: 
- Type the Apps Title then "iTunes".   


Selasa, 18 Februari 2014

How To Use Emoji Keyboard On Mac - Tip / Tutorial

Did you know that, the same Emoji emoticon's that are available on iPhone's and iPad's are also available to use on your Mac? There's no download required to use get the Emoji keyboard, it's already built-in.

You can use the Emoji's in Notes, Twitter, iMessage, or anywhere else with text. But note, if you're sending Emoji's in messages, only other people with a OS X or iOS devices will be able to see the Emoji's.


How To Use Emoji Keyboard on Macbook Computers:


To access the Emoji keyboard - press the following keys (altogether):

Control + Command + Space  


Related Posts:


Minggu, 16 Februari 2014

How To Track & Find Out Who Unfollowed You On Twitter Using An iOS App!

It's hard to get people to follow you on Twitter, unless you're a celebrity like Justin Bieber... One popular method is the 'follow back' system. Simply, you follow back everyone who follows you, or everyone who says they'll follow you back. But then after you are following hundreds of Twitter accounts, it's hard to find out when someone unfollows you, and therefore has got a 'free' follower.

But of course there's a app for that! Actually quite a few... and a lot of web services as well. Most of these "Track Your Twitter Unfollowers" services a really spammy, and will force you to tweet, (or will do so on their own), their spam advertisements.

The app I'll mention today that Tracks who follows you and has unfollowed, will allow you to see the info you want, without all the spam. Now, that doesn't mean this app doesn't alert you with with annoying popups asking you to tweet - but you can easily click, "No".

The app is:

Find Unfollowers On Twitter
By Apprizon LLC    


This app for iPhone, iPod Touch and iPad makes it easy to find out who is following, and not following you back.  Install, and allow access to the Twitter accounts you want to use.


How To Find Out Who Unfollowed Me On Twitter? 

When you open Find Unfollowers, the app will refresh and will show lists of your "New followers" and "Users who unfollowed me".   Tap on a list to see more information, and either follow someone back, or unfollow someone who unfollowed you.

All this information is available in the free version of the app.

How to see who's not following me back on Twitter?

The basic free version lets you see all this information, although you may have to scroll through your following / follower list and check that the labels all right "mutual". Otherwise there is a Pro version of Find Unfollowers and in-app purchases for other premium features.

But if all you want is to see who has recently followed or unfollowed you - the free version will do fine.

Also note - this app won't work for accounts with over 70,000 followers / following.

If you found this post useful, you can thank me by following @AppsReviewed1 on Twitter! And I'll follow you back.

Find Unfollowers On Twitter is FREE to download, with a PRO version available, for iPhone, iPod Touch and iPad devices.


How To Display Your Name In Mac Status Bar

To add a little personal touch to your Mac, you can display your name, or account name, in the Status bar. The option is a part of the Users and Groups settings, that allows quick switching between user accounts. 


To display your Name or Account name in the OS X status bar:

1. Open 'Settings'.
2. Click 'Users and Groups'.
3. Click the 'Lock', enter your password, so you can edit settings.
4. Then click 'Login Options'.
5. Check the 'Show fast user switching menu as', on.
6. In the drop-down option box next to the option, select 'Full name' to display your full name, or 'Account name', to show the account name you set up, or 'Icon', to show only a icon.


Sabtu, 15 Februari 2014

How To Stop (Mute) Mac From Making Startup Sound - Mac Tip


Nothing's worse when you want to be quiet than starting your Mac and hearing that (loud) start-up sound. If you want to start your Mac quietly, here's a useful tip:

- When you startup your Mac, hold down the 'Mute' key on your keyboard!